About Johanna

My photo
Chicago/Aurora, IL, United States
I am just like so many busy moms out there. I want to create great meals for me and my family where the food brings us together at the end of a long and hectic day. I want to empower moms to feel like they are able to make Great Everyday Meals by using simple, accessible, and inexpensive ingredients and basic cooking techniques. It’s more about family and less about slaving away in the kitchen cooking. I have been a restaurant industry professional for about 10 years and have a great passion for cooking. I will share tips, recipes and techniques that I have learned to arm everyday cooks with the foundation to simple yet great tasting cooking! Johanna M. Cook
MyFreeCopyright.com Registered & Protected

Monday, May 17, 2010

For the Kiddos - Chicken & Alphabet Soup


Spring in Chicago has been gloomy, wet and chilly lately and I was in the mood for some comforting, homemade soup. As I was cruising down the grocery store isles with my list of things and ingredients to buy for the week, I was also trying to find inspiration, specifically in the pasta section. Pasta is just one of those comfort foods that so many people go to, especially on chilly and gloomy days. As I was scanning all the different types of pastas, I came across alphabet pasta. Right then and there I had an OMG moment!

Why haven't I thought of this before? Almost everyone I know has great memories of eating alphabet soup as a child. I remember being so mesmerized by all the letters floating around in the broth. I don't even remember the last time I have eaten alphabet soup, and more importantly I don't ever recall my kids ever eating alphabet pasta. I don't even think they know it exists! I had to buy it and make them a great chicken noodle soup using this pasta. Even better is my toddler, Sofia, who's learning her letters is going to be so excited to eat her letters!

This soup is so incredibly simple to make, you'll be wondering why you'd ever buy the canned stuff ever again!

Chicken & Alphabet Soup

2 cups of alphabet pasta
4 cups of chicken broth
2 bay leaves
3 stalks of celery - diced
1 carrot - diced
1 small onion - diced
1.5 cups of shredded chicken
1 TBL of canola oil
salt & pepper


Heat a large pot with canola oil and saute the onions, celery and carrots just until they start to sweat and release their flavor. Pour the chicken broth and bring to a boil. Add 2 tsp of salt and 1/2 a tsp of pepper. Add the pasta and cook for about 5 minutes. Add the cooked shredded chicken and heat through for about 3 minutes and serve.

TIP: This soup is great using left over rotisserie chicken!


Saturday, May 15, 2010

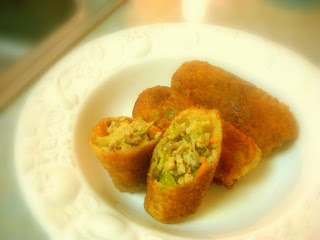
Fried Egg Rolls


I must admit, there is something deliciously awesome about a greasy little egg roll. The problem with making these great rolls is the time it takes to prep all the ingredients and roll each and every one. On Mother's Day, after my husband and kids treated me to a fabulous brunch at the golf club, I decided to return the favor by making homemade egg rolls. Boy, were they excited!

There are various versions of the egg roll. The typical Chinese egg roll is made with a thicker wonton wrapper. The Filipino version, Lumpia, is made with a thinner wrapper. The filling also varies in different parts of Asia. Some make a filling mixed with cellophane rice noodles, cabbage, ground  pork, and shrimp. What's great about the filling is that it's purely subjective. You can julienne zucchini, leeks, shiitake mushrooms and use that as your filling. Virtually, whatever you desire can be wrapped in wonton skins and deep fried! My recipe is pretty typical. I use Savoy cabbage, shiitake mushrooms, shredded cabbage, bean sprouts, celery and ground chicken.

Tip: Make a big batch and freeze for the future. Freeze them separately on a cooking sheet and place in a freezer bag once it's been completely frozen.

Fried Egg Rolls

1 head of Savoy cabbage
1 - 10 oz bag of shredded carrots 
8 oz of shiitake mushrooms - thinly sliced
4 stalks of celery - thinly sliced
1 - 8 oz bag of bean sprouts
1 lb of ground chicken (you can use ground turkey, ground pork, ground beef or minced shrimp)
3 TBL of soy sauce
1 tsp of red pepper flakes
1/2 tsp of ground black pepper
1 tsp of ground ginger
1 TBL of kosher salt
3 TBL of canola oil
1 - 12 oz package of wonton wrappers
1 egg - beaten with 1 tsp of water

Heat a large saute pan on high heat with canola oil. Brown the ground chicken in the pan and break chunks into small pieces.  Add the salt, pepper, ground ginger and red pepper flakes. Once the chicken is browned add all the vegetables, except of the bean sprouts. Toss the vegetables in with the chicken and saute for about 5 minutes. Add the soy sauce and bean sprouts and saute for another 5 minutes. Turn off the heat and let cool.
On a flat and dry surface lay out a wonton wrapper, like a diamond. Take about 2 tablespoons of the cooled filling and place it on the wrapper about 1 inch from the lowest point.

Carefully take the right and left sides of the wrapper and fold it towards the center. Take the bottom point, and slowly fold it up, tuck it in and roll. When you get to the end, brush the last point of the wrapper with the egg wash mixture to secure the egg roll.
Place on a cookie sheet lined with wax paper.

Deep fry in a deep fryer or a pot filled with about 2 cups of canola oil, heated to at least 360 degrees.

Monday, May 10, 2010

Soy Braised Chicken


Soy sauce is as important to Asian cooking as balsamic vinegar is to Italian cooking. It's basically made by fermenting soy beans. Soy sauce is an important flavouring ingredient in so many kinds of Asian cooking. And just like balsamic vinegar, there are even varieties of soy sauce that are rare and very expensive.

"A study by National University of Singapore shows that Chinese dark soy sauce contains 10 times the antioxidants of red wine, and can help prevent cardiovascular diseases.[13] (However, it is unlikely to be used in nearly as great a quantity as wine.) Soy sauce is rich in lactic acid bacteria and of excellent anti-allergic potential.[14][15]"  
http://en.wikipedia.org/wiki/Soy_sauce

Today, I made Soy Braised Chicken. It's a Filipino dish called Adobong Manok. To braise any protein basically means that you will be cooking the meat in a liquid in low heat until it is fork tender. This type of cooking is used to make pot roast and coq au vin, just to name a few. I guess this is the Filipino version of coq au vin :). This dish has only a few ingredients, chicken, soy sauce, vinegar, onions, bay leaves, garlic and pepper, potatoes and sweet potatoes. Basically, you throw everything in a pot, let it simmer for about an hour and then serve it over fluffy pillows of delicious jasmine rice. The authentic Filipino version does not use sweet potatoes. But I like the contrast of it's sweetness, and I love it for it's nutrition. This will definitely spice things up in your home.

Soy Braised Chicken

1 package of  "pinwheel chicken"
2 cups of water
10 oz bottle of low sodium soy sauce
1/2 cup of apple cider vinegar
1 tsp of whole black peppercorns
3 garlic gloves - chopped
2 bay leaves
1 onion - chopped
1 yellow potato - chopped
1 sweet potato - chopped
2 TBL of vegetable oil

Heat a large pot in meduim-high heat with vegetable oil. Brown all chicken pieces. Not all the chicken pieces may fit at the same time, so brown 3-4 pieces at a time. When all the chicken pieces are browned, put them all back in the pot and add the onions, garlic, bay leaves, soy sauce, water, vinegar, black peppercorns and potatoes.

Bring to a boil, then simmer at low heat, uncovered for 45 minutes to 1 hour, until the chicken and potatoes are fork tender. There is no need to add salt, as the soy sauce is already salty. Taste and add salt if needed.

Serve on top of hot jasmine rice.

Saturday, May 8, 2010

Wanna-Be Cooking Show


Today is little different than previews posts, as I won't be posting a recipe, but simply sharing my experience. The thought of blogging about my experiences for all the world to read was ridiculous to me in the beginning. As I started to find out about people's blog websites (I was mostly interested in cooking/food blogs), I realized that it was actually a great way to share my love of food and cooking to others. When I went on my maternity leave, I thought that blogging about my recipes would be a great way to share, not with the world, but my closest friends and family about my cooking experiences professionally and personally. Plus, it was just the creative outlet I needed while sitting at home just waiting to burst with my third child.

Anyone who's known me, even have just met me recently, will know that I have a great passion for food. It's in my blood. It's therapeutic. It's creative. It's delicious (most of the time). Since I started this blog, more and more people started to become interested in what I was doing, especially mothers. Here I am, a mom of 3 kids, one of who is an infant, working full time and trying my best to manage it all. It's not a far-fetched idea. I'm not the only one doing it, and I know that I've got company. So, as I post each recipe a few times a week, people realize that these are actual meals I am serving to my family. It's not just some production to make fancy food, take pictures and post it on a website. It's real food that I've prepared while the toddler is in the living room watching TV, my 8 year old on the kitchen table asking me about his math problems, and an infant screaming in the background while my husband attempts to calm her down with a bottle of formula. Real life that so many others are living.

Today, this past-time has become very important to me. Now, it's more than just a creative outlet. I want to share with people, especially mother's, that making great food doesn't mean you have to sacrifice time and money. Believe me, I've got a strict budget for both! Feeding my family and friends is important to me. It's how I show them that I love them, and I care. And I want them to taste the love in food I make. I don't think I'm the only one who feels that way. So, now as I embark on this new journey as Momma Cuisine, I hope that you all can join me in this great adventure.

Monday, May 3, 2010

Pasta w/ Jumbo Meatballs


I love pasta. It's a great comfort food. However, the typical spaghetti and meatballs in many households have become jarred and frozen conconctions thrown together in a pot. Don't get me wrong. I use a lot of jarred tomato sauces for times that I don't have the time and energy to make sauce from scratch (and that's often). But nothing will ever compare to the homemade version. Making sauce from scratch can be intimidating. The key is to let it simmer long enough that all the flavors meld together to make outstanding flavor. My sauce has an ingredient that people might find odd in a pasta sauce, but it helps to cut through the acidity of the tomatoes and give it a hint of sweetness. SUGAR. Yes! Sugar. This is also the reason, besides trying to throw in some veggies for the kids, I add carrots. When cooked, carrots have a sweet taste that also lends to the slight sweetness in the sauce. It's not often that I make pasta and meatballs from scratch. But when I do have the time to make it, my kids and husband are sooo happy to indulge in this homy, comforting and delicious dish. How could your family not appreciate this from you? :)

Pasta w/ Jumbo Meatballs

For the meatballs:

1.5 lbs of ground beef
2 tsp garlic - finely chopped
3/4 cup of Italian seasoned breadcrumbs
1 egg
1 TBL of salt
1 tsp of pepper
2 tsp of fresh chopped Italian (flat leaf) parsely

For the sauce:

2 TBL of olive oil
1/2 green bell pepper - diced
1 carrot -diced
1 yellow onion - diced 
1 28 oz can of peeled & crushed tomatoes
1 TBL of dried thyme
1 TBL or dried oregano
1 tsp of red pepper flakes
1 TBL of salt
2 TBL of granulated sugar

In a large mixing bowl, combine the ground beef, parsely, salt, pepper, breadcrumbs and egg. Form into large meatballs. 1.5 lbs makes about 10-11 jumbo meatballs.

Boil a pot full of water, adding 2 TBL of salt to flavor the pasta.

In a large, deep sauce pot, heat 2 TBL of olive oil in medium-high heat. Brown the meatballs. It is not important to cook the meatballs all the way through because you will be finishing cooking it in the sauce. The important thing is to give it a nice brown color and form a crust on the exterior of the meatballs. Once the meatballs have been browned on all sides, set aside.

In the same pot, add the onions, garlic, carrots and green bell peppers and saute in meduim-low heat. "Sweat the onions", meaning let it cook slowly so that they become tender and not burn and the flavors come out. Add the dried thyme and oregano. Because I am using dried herbs, it is key to let them bloom, so adding them early in the cooking process allows for that to happen. If I was using fresh herbs, I would have put them in after the tomato sauce was added. Also, dried herbs are more potent in flavor that fresh herbs, so use less.

After the vegetables have become tender, add the crushed tomatoes, salt and red pepper flakes. Simmer at low heat for about 20 minutes, stirring occasionally. After 20 minutes, add 2 TBL of sugar and carefully place the browned meatballs in the sauce stirring it in with the sauce gently so that they do not break. Simmer it for another 15 minutes to let the flavors combine together. At this point, add the pasta into the boiling, salted water and cook for 8-10 minutes, until the pasta is al dente. Take the pasta out and place it in a large pasta serving bowl. Drizzle it with a little olive oil to prevent from sticking together.

Trick: While the sauce is simmering, occasionally add a laddle of the salted pasta water (no more than 3) to allow the sauce to move around. The sauce will reduce because it is simmered for a long time, so it is important not to let it get too thick.

Laddle the sauce on the top of the pasta and carefully place the meatballs on top. Add grated parmesan cheese and fresh chopped parsely for a nice presentation. Sit back and enjoy hearing all the "Oooohhh's" and "Aaaaaahhh's" at the dinner table. GREAT JOB MAMA!


Saturday, May 1, 2010

Roasted Trout Stuffed w/ Fennel & Citrus

It's Saturday and I rarely have the weekends off from work. So, I decided to get a little "fancy" and roast 3 whole trout and stuff it with fennel, honey tangerine, and lemon wheels. Fennel is a bulb that has a great licorice flavor. Essentially, this recipe only has 5 ingredients (not including s&p), trout, olive oil, lemon, fennel and honey tangerine. It's incredible how simple this is to make, but the presentation is just plain awesome! What a way to wow your guests at a weekend gathering in your home :).

Roasted Trout Stuffed w/ Fennel & Citrus

3 Whole Trout about 1 lb each (cleaned and de-boned by your fish monger)
1 bulb of fennel - slice thinly
1 honey tangerine - cut into half moons
1 lemon - cut into half moons
1/4 olive oil
salt & pepper


Line a baking sheet with foil or wax paper. Line up the fish parallel to each other and lightly drizzle inside with olive oil and a pinch of salt & pepper. Gently stuff with fennel, and 3 each of the lemon and honey tangerine half moon slices, alternating the citrus for a nice presentation. Take the green leafy ends and also stuff it in the trout for a bright green color to add to the flavor and presentation.Whatever is left over from the fennel and citrus, place under the fish and all over the baking sheet to roast. Drizzle olive oil on the outside of the fish and fennel and citrus, and squeese 2 TBL of lemon juice over the entire sheet. Sprinkle with salt & pepper.

Roast in the oven for 30 minutes on 400 degrees.
THAT'S IT!!!

Wednesday, April 21, 2010

Fresh Tomato and Arugula Angel Hair Pasta w/ Roasted Lemon Pepper Chicken Leg Quarters


I love dishes that look elegant, taste great, yet doesn't involve me spending the whole entire day in the kitchen. An even better plus is that this dish is cost effective using very few and basic ingredients. What many people don't realize is that an elegant and delicious meal does not have to involve crazy, hard to find ingredients and super chef cooking techniques. It's usually the simplest and freshest ingredients, cooked a very basic way that yields amazing meals. What sets it apart is cooking with great, fresh food.

In this simple, Italian inspired pasta dish, I tossed in arugula, a mildly peppery green used inian elegant main dish, any night of the week.

The chicken leg quarters are simply spiced with lemon pepper, a premade spice mix found in any common grocery store in America. Just be careful about the amount of salt added in the mix, as you don't want to over salt the chicken. In keeping with the olive oil theme, I drizzled it with olive oil and squeezed lemon juice to brighten up the flavors even more. Stick it in the oven for 45 minutes and whala! Lemon pepper chicken!


Fresh Tomato and Arugula Angel Hair Pasta

1 LB of angel hair pasta
3 large diced roma tomatoes
2 sliced garlic gloves
1/2 medium sized onion or 2 shallots diced
1/2 cup of extra virgin olive oil
1 LB of fresh arugula
1/4 cup fresh grated parmesan cheese


Roasted Lemon Pepper Chicken Leg Quarters

5 chicken leg quarters
5 TBL of lemon pepper mix - 1 TBL for each leg quarter
Olive Oil
Juice of one lemon
salt

Cook the pasta until al dente in salted boiling water. Heat a large sauce pan in medium-high heat with olive oil. Cook the chopped onions (or shallots) and garlic until they become tender. Add the diced roma tomatoes and cook until the tomatoes have started to break down, but has still retained most of their shape. Add the cooked pasta including some of the pasta water (no more than 1/4 cup) to help incorporate all the ingredients. Toss the pasta and turn the heat off. Take the pasta out of the saucepan into a serving dish. Toss the fresh arugula in with the hot pasta and top with 1/4 cup of freshly grated parmesan cheese.

Heat the oven to 425 degrees. Rub each leg quarter with 1 TBL of lemon pepper seasoning mix and 1 tsp of kosher salt. Dress in olive oil and lemon juice. Roast in the oven for 45 minutes, and until the internal temperature reaches at least 165 degrees. Serve alongside pasta.